How to Add Google Search Console to Squarespace: The Complete 2024 Guide
You dont need to be a developeror even open a code blockto get Googles search data flowing into your Squarespace dashboard. In 2024, you can verify a Squarespace site in under 60 seconds by copying a single TXT record or tapping Squarespaces built-in token. The payoff is huge: once Google Search Console (GSC) recognizes your domain, you unlock index coverage alerts, real-time keyword queries, and richer Sage SEO insights without risking a broken layout or lost traffic.
Why Google Search Console Matters for Squarespace Sites
Squarespace already handles mobile-friendly templates and automated sitemaps, but Google Search Console is the missing analytics layer that shows how those pages perform in search. Inside GSC, you can:
- Spot crawl errors before they tank rankings in the Index Coverage report.
- See every query that triggers your siteeven the hidden long-tail terms that analytics tools miss.
- Request Rich Result validation so product snippets and FAQs pop in SERPs.
Connect that data to Sage SEOs 90-day dashboard and you get a live feed of keyword gains, click-through rates, and on-page suggestionsno spreadsheets required. For agencies juggling multiple Squarespace sites, GSC is the single source of truth that alerts you when something slips before clients notice.
Prerequisites & What Youll Need
Before you dive in, make sure you can check these boxes:
- Squarespace Owner-level login. Administrators cant access DNS settings, so confirm you have full privileges.
- Domain access. If your domain lives inside Squarespace, youre set. If its with GoDaddy, Namecheap, or another registrar, keep those login credentials handy.
- Google account. Use the Gmail tied to other Google tools so data stays in one ecosystem.
Thats it. No premium Squarespace plan, no fancy pluginsjust the essentials to connect Google Search Console to Squarespace without friction.
Method 1: Verify Through Squarespaces Built-In Token
Step 1 Generate the token in Squarespace
1. From your sites Home Menu, click Settings Connected Accounts Google Search Console. 2. Hit Connect. Squarespace instantly produces a meta-tag verification token formatted like google-site-verification=abc123xyz. Copy itno edits needed.
Step 2 Paste the token into Google Search Console
1. Open Google Search Console and click Add Property. 2. Choose the URL-prefix option. Enter your full homepage URL, trailing slash included (https://www.example.com/). 3. When Google presents multiple verification methods, select HTML tag. Paste the token you copied from Squarespace.
Step 3 Confirm ownership & check status
Click Verify. Google pings your Squarespace site, finds the meta-tag, andif caching isnt blocking itreturns a cheerful green checkmark within seconds. Navigate back to GSCs Settings Ownership Verification panel to confirm the status has flipped to Verified.
Pro tips for 2024s interface
- Multiple contributors? GSC now lets you invite read-only or full users under Settings Users & Permissions.
- HTTPS versions auto-verify. When you verify the
https://property, GSC automatically links thehttp://version, saving an extra step. - Keep the token live. Deleting the meta-tag or disconnecting the Squarespace integration will revoke ownership and pause data collection.
For most users, this method is straightforward and does not require DNS updates. Yet if you manage domains outside Squarespaceor prefer the fastest, copy-paste-once workflowthe DNS TXT method below is even slicker.
Method 2: Add a DNS TXT Record The Fastest & Most Reliable Route
Copy the TXT record from Google
Inside GSC, pick the Domain verification option instead of URL-prefix. Google supplies a TXT record formatted as:
TXT @ google-site-verification=AbcDeFg123456
Copy it exactly; the leading @ keeps the record attached to your root domain.
Add the TXT record inside Squarespace Domains
If your domain is hosted with Squarespace:
- Navigate to Settings Domains, click the domain, and open DNS Settings.
- Choose Add Record TXT. Host:
@Value: Paste the verification string. TTL: Leave the default (1 hour) or lower to 600 seconds for faster propagation.
Adding the record on external registrars
- GoDaddy: Domains DNS Add TXT.
- Namecheap: Domain List Advanced DNS Add New Record TXT.
- Cloudflare: DNS Add record, set proxy to DNS only so Google can see it.
Save changes, return to Google Search Console, and click Verify. Because TXT records bypass site caching, verification typically completes in under 60 seconds. Keep the record live to maintain ownership across sub-domains and protocols automatically.
Troubleshooting Common Verification Errors
Ownership Verification Failed Loop
If Google still shows the dreaded red banner after you click Verify:
- Check for typos. One stray space in the TXT value breaks the lookup.
- Confirm DNS location. The record must sit at the authoritative nameserver. If your domain uses Cloudflare but you changed the registrar panel, Google never sees it.
- Avoid multiple tokens. Keep only one GSC TXT record per domain; duplicates can confuse the crawler.
Propagation Delays & Forcing a Re-check
Most registrars push DNS updates within minutes, but some take up to 24 hours. Use DNSChecker.org to confirm the TXT record is visible globally. Once it appears, return to GSC and hit Verify again. Theres no limit to verification attempts.
Still stuck? Remove caching layers (e.g., toggle Cloudflare orange cloud to gray) or switch to the meta-tag method temporarily.
After Verification: Submit Your Sitemap & Other Key Steps
Find Squarespaces Auto-Generated Sitemap
Squarespace quietly builds an XML sitemap at /sitemap.xml. Test it by visiting https://www.yourdomain.com/sitemap.xml. The file includes every live, non-noindex page.
Submit the sitemap inside GSC
- Navigate to Index Sitemaps.
- Enter
sitemap.xmlin the Add a new sitemap field and click Submit. - Google queues the file; status will change from Success to Indexed n URLs once processed.
While youre in GSC, toggle Search Console Settings Email notifications to get instant alerts on coverage issues, manual actions, and significant traffic swings.
Supercharge Data in Sage SEOs 90-Day Dashboard
Verification is just the starting line. Sage SEOs dashboard pulls your fresh GSC data every 12 hours, overlays it with on-page metrics, and surfaces keyword gaps you can realistically win in 90 days. Track click growth, impression-to-click ratios, and page-level CTR without juggling multiple Google accounts.
Agencies appreciate the single-pane view across dozens of Squarespace properties, while solopreneurs love the plain-English action items: Add FAQ schema to /pricing, Compress hero image on /shop. Connect once, and Sage does the heavy lifting until youre ready to export a white-label report.
Final Checklist & Wrap-Up
- Log in with an Owner-level Squarespace account and a Google account.
- Choose Method 1 (meta-tag) or Method 2 (DNS TXT) to add Google Search Console to Squarespace.
- Click Verify and confirm a green checkmark.
- Submit
sitemap.xmlin GSC. - Turn on email alerts for crawl and coverage issues.
- Sync GSC data with Sage SEOs 90-day dashboard for actionable keyword insights.
Bookmark our Squarespace SEO checklist and our step-by-step guide on adding Google Analytics to Squarespace to round out your optimization toolkit. Your site is now verified, monitored, and primed for search growthno code nightmares required.
Share this
Related Posts
-
Connecting Google Analytics to Squarespace: Troubleshooting and Pro Tips
Most Squarespace users discover the problem the same way: they log into Google Analytics weeks after “setting it up,” expect a tidy dashboard of buyer behavio
-
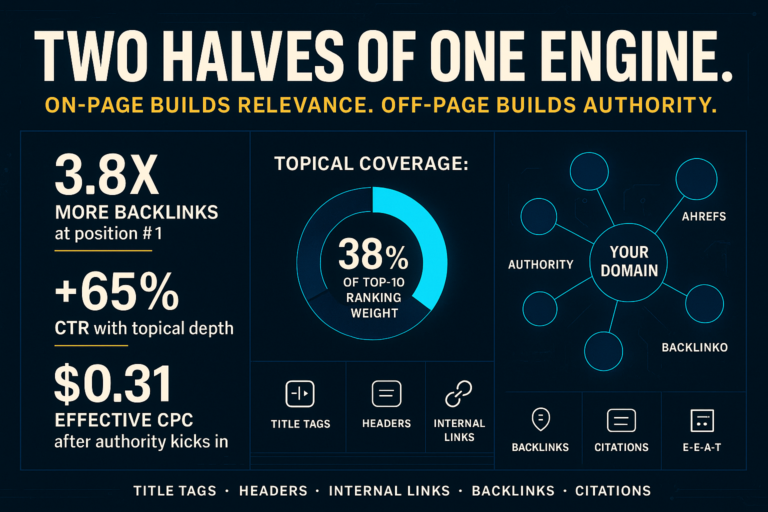
Comprehensive Guide to On-Page and Off-Page SEO
Here’s the uncomfortable truth most SEO guides bury: the #1 result in Google has an average of 3.
-
AI-Powered Content Marketing: Tactics That Deliver 90-Day Wins
Key Takeaways Precision targeting beats volume for fast AI content wins Refresh page-2 posts before…